Introduction
Congratulations on acquiring this new high-quality culinary board! Your board will be both a truly impressive and practical addition to your kitchen or dining room that promises to transform both your culinary adventures and your entertaining experiences. Having a refined board not only elevates your cooking and entertaining experience but also shows a deep respect for the ingredients and dishes you serve. Our boards are beautifully crafted and showcase exquisite attention to detail, from the fine finish to the elegant design of the board. The durability and craftsmanship of this board ensure that it will be a faithful companion in your culinary and hosting endeavors for many years and will become a cherished piece in your home, but you'll need to take good care of it for your board to last. Thankfully, it's very simple.
Cleaning Instructions
Wash the board with warm water and mild dish detergent. When you clean the board, be sure to wash both sides. You may put the board in the sink to wash it, but do not leave the board to soak in the sink. Once clean, use a towel to wipe off any excess water and then stand the board on it's side to dry. Avoid placing the board flat to dry, as this will cause the board to dry unevenly and could cause the board to warp or cup.
The Do's
Our boards are thoughtfully prepared for immediate use right upon delivery. Each board is meticulously pre-treated with a unique, food-safe blend of tung oil, orange peel oil, and beeswax. This special blend not only enhances the durability and longevity of our boards but also ensures they are safe and ready for culinary use as soon as they arrive at your doorstep, so do use it as soon as you receive it.
- do clean both sides shortly after using
- do stand board so that all sides can dry equally
- do moisturize as often as you deem necessary or as frequently as you desire
- do leave the board out on your counter so that every time you go in your kitchen it brings you happiness and joy when you look at it
The Don'ts
The following are a list of things not to do with your board as it will either dull and mark the surface or worse, compromise the glue joints, cupping, warping, or cracking the board.
- don't put the board in a dishwasher
- don't submerge in water nor let soak
- don't use harsh abrasives like steel wool
- don't use harsh nor abrasive chemical cleaners like bleach or ammonia
- don't stab the board (no, seriously, don't)
- don't use serrated blades (think little saws)
- don't set hot pots nor pans on the board
- don't use vegetable oils to moisturize, they will go rancid
Aging Finish
Over time, the finish on your board will naturally wear down, especially after repeated use and exposure to water and cleaning products. This is a normal process that can be slowed down but not completely prevented. As the finish wears down, the wood may start to look dull and dry, and the cutting board may become more prone to stains and water damage. To keep your board in good condition, it's important to polish it occasionally. By regularly polishing your board, you can maintain its beauty and protective finish, ensuring it remains in good condition for many years to come.

Board Butter
Included with every board purchase is a tin of our board butter, a cornerstone of natural and sustainable wood care. It's meticulously blended from tung oil for deep nourishment, orange peel oil for a fresh scent and natural antibacterial properties, and locally sourced beeswax to form a protective barrier - our board butter is free from petroleum based products, such as mineral oil. By including our board butter, we're not only investing in the longevity of your board but also promoting sustainable, healthy, and environmentally friendly kitchen practices.
How-To Polish with Board Butter
Applying board butter to your board helps to condition and protect the wood, extending its lifespan. Here are the steps to apply board butter to a cutting board:
- Ensure the cutting board is clean and completely dry, at least 24 hours.
- Stir or warm the board butter, it should be smooth. If the board butter is too hard to spread easily, we recommend using your fingers to warm up a small amount, or use a hair dryer to warm the tin up and soften the butter - it should feel creamy, don't overheat and turn it to liquid.
- Use either your fingers (our preferred method) or a clean, lint-free cloth, included in with your board, to apply board butter to the board. Spread the board butter evenly over the entire surface of the board, in a circular motion on both surfaces and all edges, adding more as needed.
- Allow the board butter to penetrate the wood. Let the board butter sit on the cutting board for at least 20-30 minutes to allow the oils to soak into the wood and condition it properly.
- Use soap and water to thoroughly wash the cloth and hang it to dry. The cloth provided can be reused in the future after a thorough washing. Do not dispose any cloth that has been used unless it has thoroughly dried as oil rags have the potential to self-combust.
- Buff the board by using a clean, dry, lint free cloth, by wiping in a circular motion until all the excess board butter is gone and the board has a smooth finish.
- Use soap and water to thoroughly wash the cloth and hang it to dry.
- Let the cutting board rest. Just like after cleaning, stand the board on one of the edges overnight to fully absorb the board butter and dry completely before using it again.
- Repeat the process as needed. Depending on how often the cutting board is used, you may want to reapply board butter every few weeks or months to keep the wood well-conditioned and protected.
You cannot use the board butter or polish too frequently - the more often you care for your board, the longer it will last and perform well, while maintaining its new appearance.
My Board Feels Rough or Fuzzy
So, this can happen after regular use and washing of the board, it's often called "raising the grain" and while we make every attempt to minimize and prevent this from occurring, it still can. Raising the grain essentially means that the tiny little wood fibers that you cannot see have reacted to moisture and have curled up and you now feel these, which can make the board feel fuzzy, but fear not, this is very easy to fix and restore your board back to a smooth finish.
- Ensure the cutting board is clean and completely dry, at least 24 hours.
- Using 320-grit (or higher) sandpaper, gently sand along the grain (parellel to the long direction of your board), not against it. Be careful not to push too hard on the sandpaper, only give the board a light sanding until the board is smooth to touch.
- Remove any dust from your board using a dry lint-free cloth.
- Polish with board butter as instructed above.
If you need to sand your board a couple of times after different washings, do not fret, this will not damage your board. In fact after years of use, you may find yourself wanting to give the board a light sand from time-to-time.
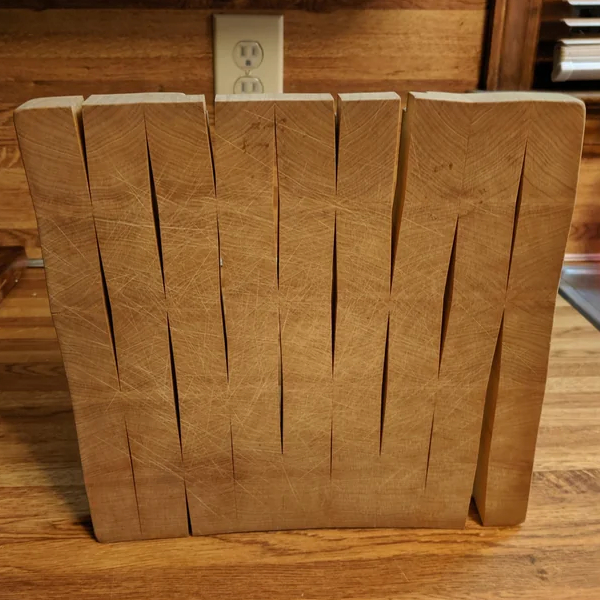
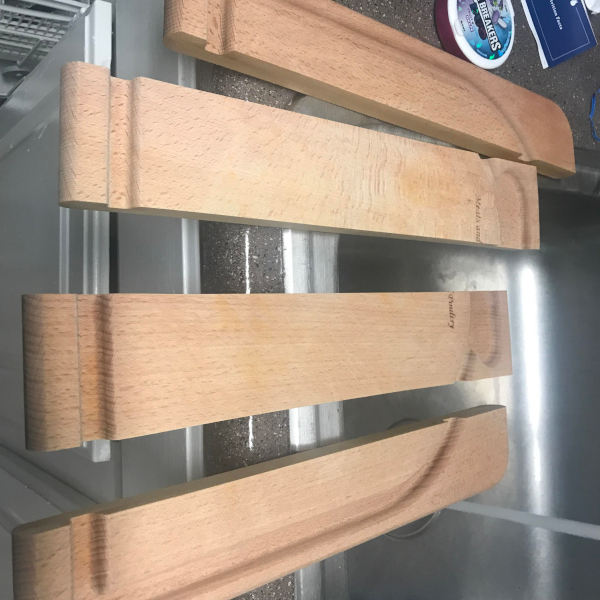
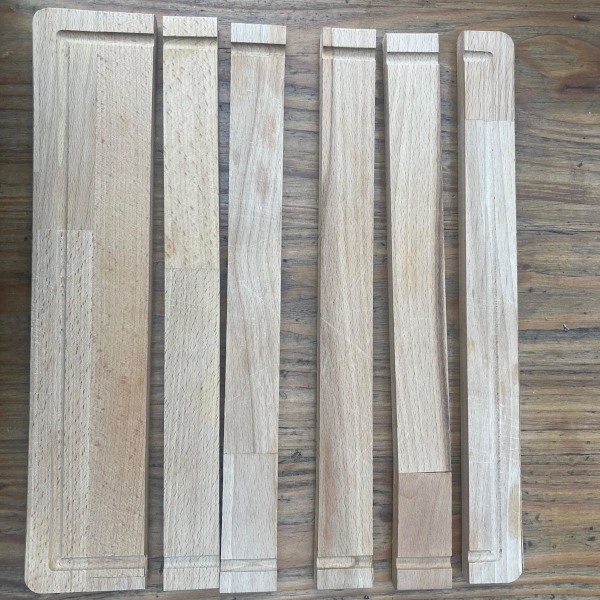
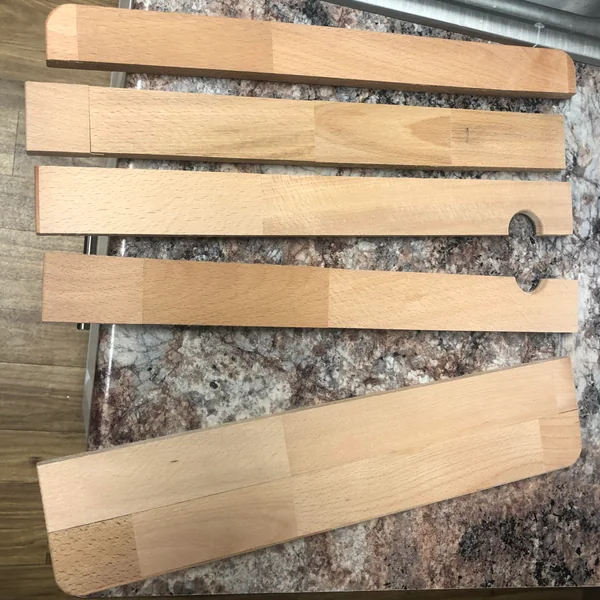
Because it Cannot be Said Enough...
Please pay attention to the list of don'ts above - especially, don’t put your wooden cutting or charcuterie board in the dishwasher, it will be disastrous. The following pictures, illustrate what will happen if you put a wooden board in the dishwasher - pictures gathered from the Internet, and thankfully not any of ours...